


Alistair Rankine takes an in-depth look at DaVinci Resolve 10 to find out how the software has evolved into an affordable editing and finishing tool It has been just over three years since I last reviewed DaVinci Resolve. Around that time, Resolve had just been acquired by Blackmagic Design, who decided to reinvent the product, […]
 Alistair Rankine takes an in-depth look at DaVinci Resolve 10 to find out how the software has evolved into an affordable editing and finishing tool
It has been just over three years since I last reviewed DaVinci Resolve. Around that time, Resolve had just been acquired by Blackmagic Design, who decided to reinvent the product, taking what was once a high-end Linux-based colour grading tool, accessible to only the most prosperous post houses and film studios for USD 350,000 and turning it into a $995 product available to all.
The product itself still remained true to the original Linux-based version, with all of the toolset intact. The power and speed behind the system would depend on how powerful a system the end user decided to run Resolve on.
For anyone new to Resolve, the power of DaVinci Resolves colour grading system is its use of a node-based layering system, similar to that found in Nuke and Flame, allowing unlimited levels of colour grading. This, combined with its use of power windows, shapes, curves, keyers and effects, basically turns the system into a high-end compositor for colour correction, with very few limitations.
Combine the toolset with DaVincis high-quality 32-bit floating-point deep processing, allowing for real-time colour grading with an optical feel and the ability to resize images with no loss of quality, and we have a very sophisticated system at our disposal.
Now, three years later, Resolve 10 is available, fully upgraded with a new user interface, toolset, cross platform integration and codec support. All of this has pushed Resolve to become not only a colour grader but a finishing tool.
Blackmagic even released Resolve Lite along the way, a totally free version of Resolve. Since the release of Resolve Lite, the differences between the lite version and the full-blown version have become minimal. Resolve Lite now offers 4K and GPU support although output resolution is limited to 3840×2160. However, if you want multiple GPU support and multiple red rocket card support then you will need to buy the full version. Resolve 10 is now available on Mac, Windows and Linux.
Media
One of the main goals with this version of the product was to bridge the gap between other products used in the post production workflow and create full round-trip workflows between all of the available non-linear editors such as FCP, Adobe Premiere, Avid Media Composer and Autodesk Smoke.
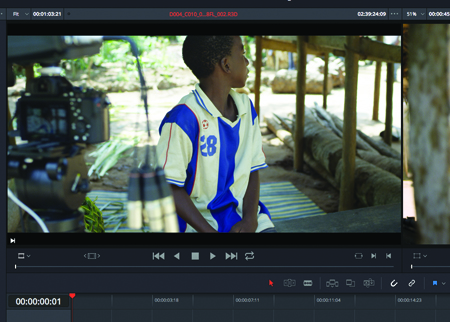
An example of this is how the colourist receives the dailies from the shoot, and imports them into Resolve. Resolve will support files from any professional cameras as well as the most non-professional camera as well along with the audio from the shoot.
The colourist can now import the footage, sync the footage with the corresponding audio by selecting the audio and the footage together, apply a one light grade to the footage and then, export the rushes in whichever format the editor desires (the delivery tab now supports audio in the timeline and has a new select all button to ensure everything in the timeline has been selected).
If the editor is working on FCP, the footage can be exported as Apple ProRes along with an XML. The editor can easily import the footage into FCP and relink it and start editing. This means that the editor doesnt need to worry about syncing rushes. This also quickens the process, as the footage is compressed, the footage is now all in the same format and has already been organised by the colourist.
Resolve as a finishing tool
Once the edit is finished, the editor can then make an XML of the cut, and all the colourist needs to do now is link the XML to the original high-resolution footage within Resolve and they have a fully functional timeline to work with. Resolve 10 now supports unlimited video and audio tracks.
If you have Resolve on the same system as your NLE or both systems are accessing a central storage then an extremely fast turnaround can be developed between platforms.
The benefit of this with regards to colour grading is that the colourist can now apply the final grade to the footage using the original camera footage, thus allowing for a far superior colour grade.
Any VFX shots that have been sent out to Flame, After Effects or Nuke can also be imported into the system and placed on the timeline to become part of the Final Grade.
Usually, when effects shots are created, they are created over length to allow for any changes the director may decide to make in the final sequence. Resolve 10 can now handle these shots without any problem as the timeline is now a fully functioning editor with source and record views, with the ability to carry out gestural editing or if needed 3- and 4-point editing. The colourist has the ability to edit, slip, slide and replace directly within Resolve. If any changes are needed on the final edit, it can be done without leaving the application.
Other timeline functionality includes the ability to drag and drop transitions between clips and also, to add slow motion to clips. The new Optical Flow processor allows for flawless slow motion and is better than a lot of slow motion effects I have seen from various NLEs out there.
One other new timeline feature is the ability to add basic text to the timeline, either to be used for final output or to be used as placeholders or for information for the editor. The text will come through in the XML and will be fully changeable by the editor.
As someone who started as an editor and is now involved in VFX and colour grading, I am a huge fan of this workflow and the new capabilities of Resolve as an editor. This makes for a perfect turnaround from shoot to finishing and the fact that it can work in conjunction with my chosen editing platform makes it even more desirable. Editors and colourists have different skillsets but as more and more of us are having to become multi-disciplined due to industry changes, this offers a great solution.
One of the new features of Resolve 10 is the ability to grade live footage as it comes from the camera, with the new function Resolve Live.
The footage can now be fed as SDI directly into Resolve and given a basic grade to give the director an accurate indication of how the shots will look once graded.
One excellent inclusion is the ability to add unlimited power window shapes within a single node. This helps to keep the number of nodes to a minimum when adding different grades to individual sections of a shot. The choice of shapes is still the same but the inclusion of a new grade tool allows you to add a gradient to the shot above and below the line of the tool with the ability to drag the tool to rotate or add feathering to it.
The ability to draw shapes accurately has been vastly improved and is faster due to the upgraded way in which Resolve deals with splines and tangent curves.
It is now possible to use third-party external plug-ins on Resolve such as Sapphire. These can be found in the FX tab and can be added to nodes in the node tree. Unlimited FX can be added to each node with full control and animation available. Plug-ins such as Sapphire dont ship with Resolve but have to be purchased separately.
A splitter/combiner node is now available in the node tree. This splits an image into red, green and blue channels. This can be extremely useful in situations where there is a lot of noise in the blue channel.
The blur tools have been enhanced and have the ability to go 10 times more blurred than before.
Another element that pushes Resolve in the direction of being a finishing tool, is its new ability to clone parts of an image to cover other parts of an image. Drawing a window, for instance, either with a shape achieves this, or you can use free hand. You can then use the node-based PTZR to clone the selected area and move it into position to cover the desired area, tracking it in position if needed.
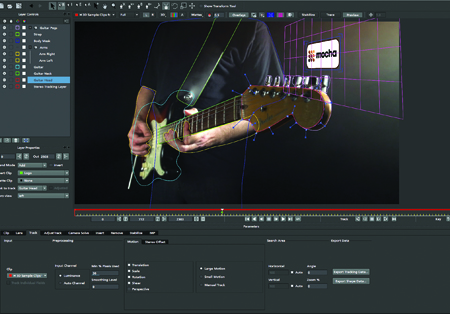
The stabiliser/tracker, something I covered in my previous review, is one of the finest, most accurate and easy-to-use 3D trackers I have come across, whether on grading software or VFX software. Combined with power windows and shapes, it allows the user to accurately track and seamlessly grade individual items within the shot. I would be happy to have this tracker on all of my software.
In Resolve 10, it is possible to save and apply tracking data to other images and stills. This is a feature that many colourists have been asking for, for some time.
Another new feature I like, albeit a very simple one, is the contrast control in the colour page to add or remove contrast to the image during the primary grading process.
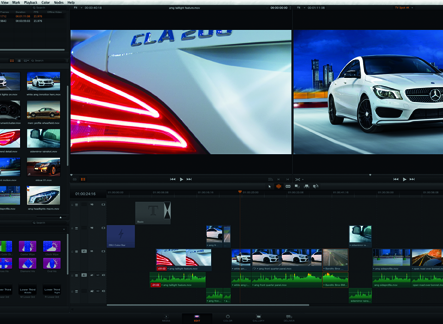
Changes within the Gallery are the ability to not only copy grades between clips using the thumbnails but also to change the grade on the thumbnails using the colour control panel.
Once the sequence has been graded, it can then be delivered to the desired format from directly inside Resolve.
Regardless of which route you go down, whether it is Mac, PC or even Linux, the best way to harness the power of Resolve is to purchase the full version. This will allow for the use of multiple GPUs and multiple Red Rocket cards, which will allow for a real-time workflow. This is something you will certainly want if you are in client lead sessions.
If you decide to buy a control panel from Blackmagic for Resolve, it will set you back just under $30,000, however other control panels are available for a fraction of the price from companies such as Tangent Wave, who also make an iPad version.
It all depends on your business and what you plan to do with the software. If you are in the high-end market, then you will most definitely want the Blackmagic control panel. If you are mainly working on corporate videos, you may decide that the Lite version is all you need with no hardware.
Conclusion
As a grading tool, DaVinci Resolve is up there with Baselight, although many colourists will argue that it is still easier to do many things on Baselight than it is on Resolve. However, a lot of that depends on the individual and their skillset.
If I had to compare it as a finishing system to something like Flame Premium with its inclusion of Smoke Timeline and Lustre Grading software as well as all of Flames composting tools, then Resolve would fall short. Not because of its grading ability, it just doesnt offer all of the toolset of Flame Premium.
I would describe the Resolve as one of the most advanced colour grading systems, offering excellent finishing and editing capabilities and the ability to offer a round-trip workflow solution between most systems.
If Blackmagic keeps developing it in this way, it may eventually mean that people do all their editing and grading inside the same software.
If this happens, then I do hope that Blackmagic starts to charge more for its software and stops offering the Lite version, or I see an industry where no one will be willing to pay for anything and when that happens, I am not sure what kind of industry will be left.